The One To Many (OTM) Specification defines two APIs to support communication between digital content repository
systems (Repository) and distributed digital preservation systems (DDP). These APIs work in tandem to allow content
captured in Repository systems to be copied to DDP systems for preservation. The APIs defined are the OTM Repository Gateway API (Gateway) for the Repository and the OTM Bridge API (Bridge) for the DDP. The Gateway and the Bridge APIs handle intermediary
communication between the Repository and DDP and allow each system to operate without any knowledge of the internals of
the other system. Each API is designed to facilitate deployment either as part of or extension to the Repository (in
the case of the Gateway) or the DDP (in the case of the Bridge) or as a stand-alone application. They each provide an
HTTP-based approach for authentication, communication, and data transfer.
The DDP workflow sections below assume that an intermediary service will be used to communicate with the OTM Bridge and
transform data provided by the OTM Bridge into a format acceptable to the DDP. The implementation of this piece will be
dependent on the architecture and capabilities of the DDP. Allowing this service to remain separate from the Bridge
ensures that the Bridge implementation is able to support a wide variety of DDPs.
The primary purpose of the systems and integrations described by the OTM Specifications is to support the deposit and
recovery of content. Content is to be considered recoverable only after it has completed a successful deposit into the
DDP. Content that has been deposited from a Repository into a DDP is intended to be recoverable even if all other OTM
system components have failed. There are no guarantees of recoverability if content has not first completed a
successful deposit.
Additional notes are provided below for the minimum required steps for implementation in Chronopolis.
Status of This Document
This document is an overview to a specification, created as part of the One to Many grant, funded by the Andrew W.
Mellon Foundation.
Initialize
The initialization operation allows a DDP and Repository to connect their respective OTM Bridge and OTM Gateway
applications so that data can be transferred between the two systems.
Flow
An agreement is reached between a repository owner and DDP system that will allow repository content to be deposited
into the DDP; appropriate SLA/MOU and other legal documentation is signed and arrangements for billing/invoicing are
made
The DDP administrator calls the Bridge Add Account endpoint to add the
repository to the Bridge system and generate the credentials needed for the repository's Gateway to connect to the
Bridge
The DDP administrator provides the Bridge credentials to the Gateway administrator
The Gateway administrator enters the Bridge credentials into the Gateway and the Gateway calls the Bridge
Register endpoint to provide the Bridge with the details necessary to make
calls back to the Gateway
Deposit
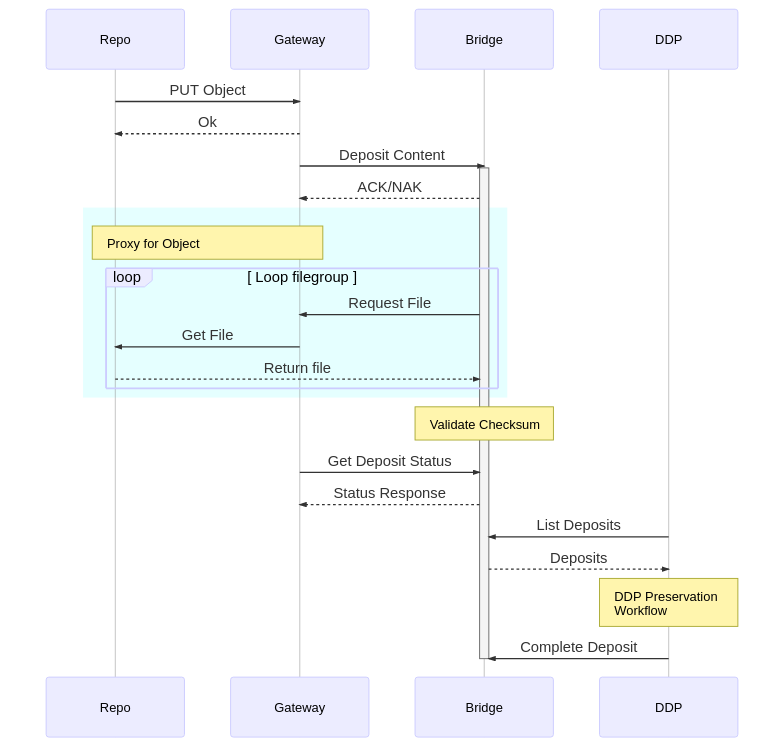
The Deposit workflow describes the process when an OTM Gateway requests that a filegroup be preserved.
As part of this workflow, a version identifier is passed from the OTM Gateway through the system so that a deposit can
be related to a point in time. It is up to the DDP to determine how to store this information in a manner suited for long
term preservation.
System to System Flow
The Repository administrator selects a set of objects to be deposited
The Repository calls the Gateway PUT Object endpoint once for each
object to be deposited; this starts the deposit process
The Gateway resolves each object into a set of files to be deposited; each file is either copied to the Gateway
staging storage area or a link to the file is captured to allow transfer to the Bridge
The Gateway calls the Bridge Deposit Content endpoint using the
object ID as the filegroup identifier and providing an identifier for each file to be deposited
The Bridge initiates a deposit action for each filegroup in the deposit request
For each file in each filegroup the Bridge calls the Gateway GET File
endpoint to transfer the file to the Bridge staging storage location
As each file transfer into the Bridge staging storage completes, the Bridge compares the checksum of the
transferred file to the checksum provided in the deposit request; any mismatches trigger a re-transfer
Once all files in a filegroup are in Bridge staging storage and all checksums are validated, the status of the
deposit is updated to `DEPOSIT_STAGED`
The DDP calls the Bridge List Deposits endpoint on a regular schedule
to check for new deposits in the `DEPOSIT_STAGED` state
For each staged deposit in the Bridge the DDP copies the files from Bridge staging storage into the DDP ingest
pipeline and performs a deposit (and replication)
When the deposit into the DDP is finished, the DDP calls the Bridge
Complete Deposit endpoint to inform the Bridge that the deposit is complete
The Bridge clears the files associated with the completed deposit from Bridge staging storage and transitions the
deposit into a completed status
The Gateway calls the Bridge Get Deposit Status endpoint in order
to provide the Respository administrator with deposit status information
Deposit Workflow
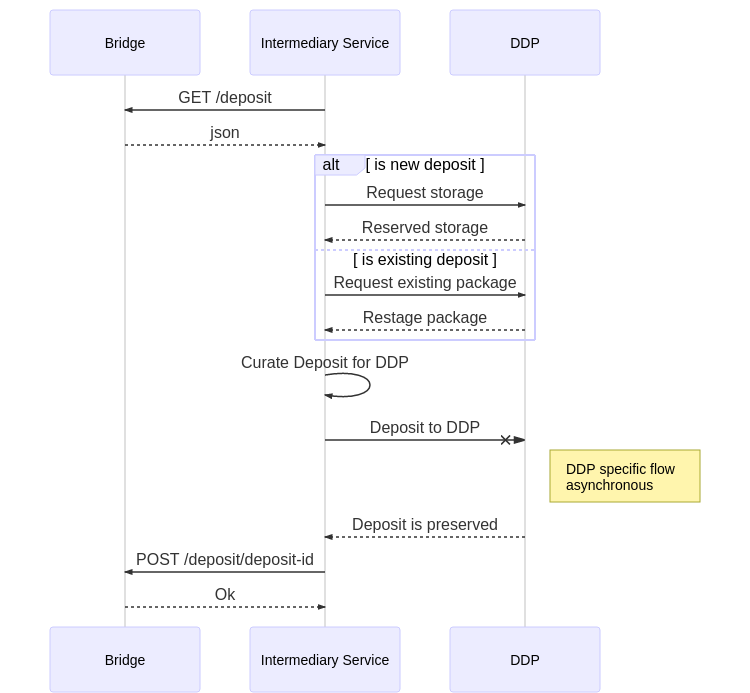
DDP Workflow
The DDP portion of the Deposit workflow assumes that the OTM Bridge has already performed initial processing in
order to prepare the filegroup for ingestion into a DDP.
An additional [[OCFL-Evaluation]] has been done with implementation notes for integration in Chronopolis
DDP Deposit Workflow
Audit
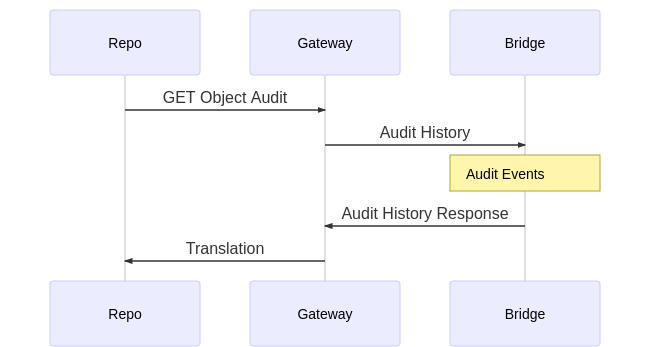
The Audit workflow retrieves actions taken on filegroups that have been deposited. It is expected that the Audit Log
will be maintained by the OTM Bridge and will contain events provided by the DDP.
The Repository manager selects an object and requests a preservation audit history
The Repository calls the Gateway GET Object Audit endpoint for the
object
The Gateway calls the Bridge Get Audit Log endpoint, specifying the object
ID as the filegroup identifier
The Bridge gathers audit data for the given filegroup and associated files from its internal data store and responds to
Gateway with the requested audit history data
The Gateway translates the Bridge audit data into a format familiar to the repository and responds to the Repository
request
The Repository displays the audit data to the Repository manager
Get Audit Workflow
Restore
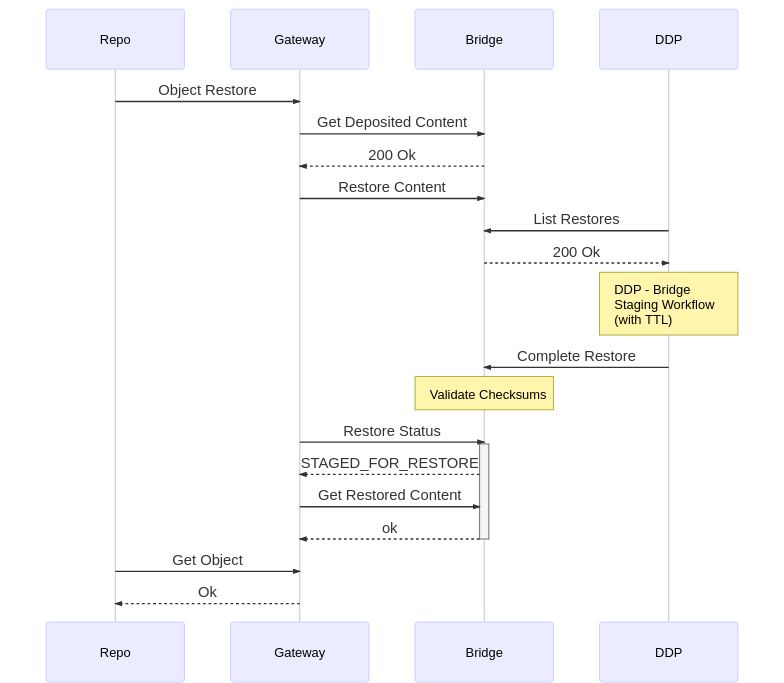
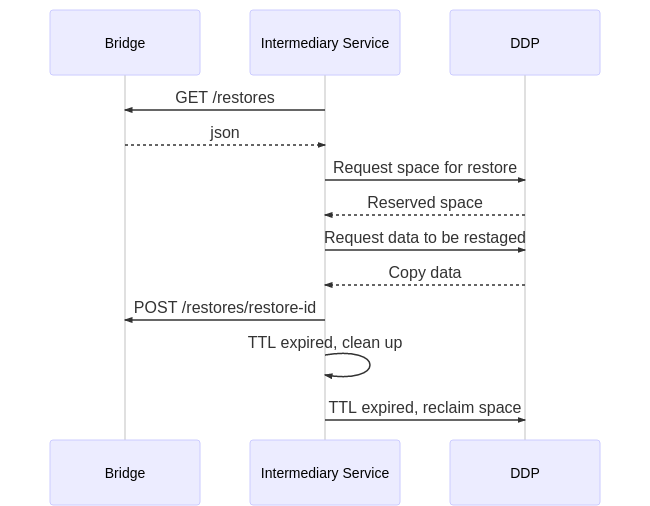
The Restore workflow handles returning data back to a Repository which had been previously deposited.
System to System Flow
The Repository manager selects an object to be restored from preservation storage
The Repository calls the Gateway POST Object Restore endpoint for
the object to be restored
The Gateway calls the Bridge Get Content Details in order to
resolve the set of files to be restored
The Gateway calls the Bridge Restore Content endpoint with the list of
files to be restored
The Bridge initiates a restore action for all files in the restore request and creates a directory in Bridge staging
storage for the restored files
The DDP calls the Bridge List Restores endpoint on a regular schedule to
check for new restore requests
The DDP copies each file in the restore request to the specified directory in Bridge staging storage
When all files have been copied into Bridge staging storage the DDP calls the Bridge
Complete Restore endpoint to inform the Bridge that the restored files
are available
The Bridge validates that all file checksums match the checksums provided in the restore request (when checksums are
provided)
The Bridge updates the status of the restore action to `RESTORE_STAGED`
The Gateway calls the Bridge Restore Status endpoint on a regular
basis to determine if the status of the restore is `RESTORE_STAGED`
The Gateway calls the Bridge Get Restored Content endpoint for
each file in the restore request and stores each file in the Gateway staging storage
The Repository calls the Gateway Get Object endpoint and pulls the
content into repository storage
The Repository sends a notification to the Repository manager that requested the restore
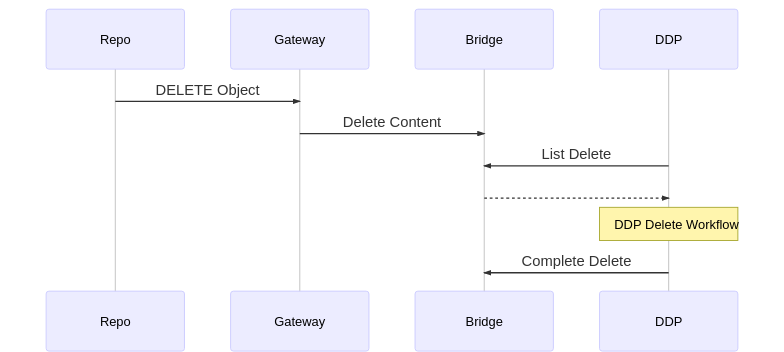
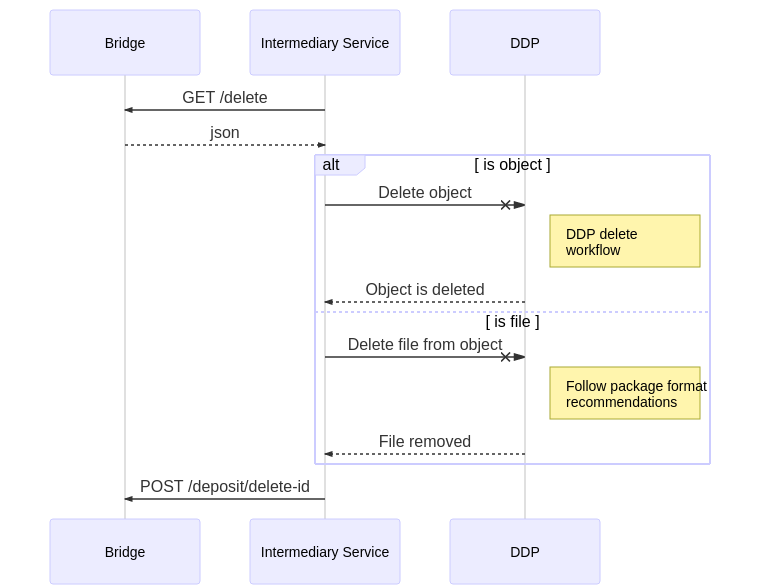
The Delete workflow handles removing data from a DDP. It is assumed that this will be an operation which is
non-recoverable and permanently removes data from a DDP. Deletes are expected when preserved content is discovered to be
subject to legal or administrative restrictions that require its removal. It is recommened that repositories restrict the
ability to delete content.
System to System Flow
The Repository manager selects an object to be deleted from preservation storage
The Repository calls the Gateway Purge Object endpoint for the object
or version to be deleted
The Gateway calls the Bridge Get Content Details endpoint and
resolves the object into a set of files to be deleted
The Gateway calls the Bridge Delete Content endpoint with the list of
files to be deleted
The Bridge initiates a delete action for all files in the delete request
The DDP calls the Bridge List Deletes endpoint on a regular schedule to
check for new delete requests
The DDP performs a delete on each requested file; when all deletes are completed, the DDP calls the Bridge
Complete Delete endpoint to inform the Bridge that the delete is
complete
The Repository administrator checks the object status in the Repository; the Repository requests information about
the object from the Gateway to provide information.